Configuration and FLASH Screen
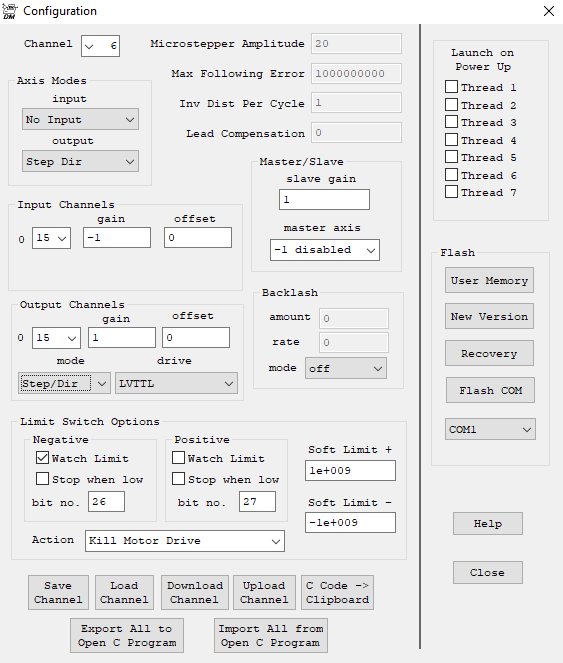
(Click on above image to jump to relative topic)
The Configuration and FLASH Screen displays and allows changes to KFLOP's configuration and allows the configuration, new firmware, or user programs to be FLASH'ed to non volatile memory.
 Each axis
channel is configured independently. To view or make changes to a configuration first select the desired axis channel using the channel drop down. Note that changing an axis on any screen switches the active channel on all other screens simultaneously.
The parameters for each axis's configuration are grouped into three classes:Definitions, Tuning, and Filters Each class of parameters are displayed on three corresponding screens:
- Configuration Screen
- Step Response Screen
- IIR Filter Screen
The Configuration Screen contains definition parameters that should be set once and remain set unless a physical change to the hardware is made. For example, a Stepper motor might be replaced with a Brushless Motor and Encoder.
The Step Response Screen contains parameters that are tuning related and are located where the tuning response is most often adjusted and checked. For example, PID (proportional, intparameters are located there.
The IIR Filter Screen contains parameters related to servo filters.
Utilities
![]()
Configuration settings are normally defined and tested using the KMotion Screens. After they have been determined to work properly they can be converted to C code and placed into a C programthat can then be used by applications to configure KFLOP without needing to use KMotion Screens. Axis Channel Settings can also be loaded/saved to disk files. See KFLOP Axis Configuration and Parameters.
The buttons along the bottom of the Configuration Screen allow a set of axis parameters to be:
- Saved or Loaded from a disk file (*.mot)
- Uploaded or Downloaded to KFLOP
- Converted to equivalent C Code for use in a KFLOP C Program (note you will not see anything happen but the data will be placed in the clipboard. Paste it into a C Program to see it)
Note that these buttons operate on all parameters (for one axis) from all screens as a unit.

To completely synchronize all the Configuration Screens (Config/Flash, Step Response, and Filters) for all axes to a C Program use the Export All to Open C Program Button. To Import all settings from a C Program select the Import All from Open C Program Button. The C program must be open on the C Program Screen. In both cases the C Program will be scannedto find blocks of axis settings and will determine which axis exist in the C Program. The results of the scan will be displayed before importing or exporting the settings. The dialog box below shows an example where 3 channels were found Select OK to proceed with the import.

Axis Modes


Use the respective dropdown to set either the axis Input or Output Mode. The input mode defines the type of position measurement (if required) for the axis. Closed loop control always requires some type of position measurement. For open loop stepper motor control, position measurement is optional.
The output mode determines how the output command should be achieved. Either by driving SnapAmp PWMs and Full Bridge Drivers to control a specific type of motor, by driving a Kanalog DAC signal that will drive an external power amplifier, or by driving Step and Direction digital outputs.
No Output mode is used when no output is required or a User Program will be writing the output to some device not directly supported (ie PWM Outputs).
Microstep mode is used with SnapAmp to apply sine/cosine currents to a stepper motor (this does not refer to driving microstepping Step Dir Drives).
DC Servo mode is used with SnapAmp to drive Brushed DC Motors.
3PH Servo mode is used with SnapAmp to drive Brushless 3 Phase Motors.
4PH Servo mode is used with SnapAmp to drive Brushless 4 Phase Motors (ie Steppers as servos).
DAC Servo mode is used with Kanalog DACs to drive Analog Amplifiers.
Step Dir mode is used with open loop Step/Direction Drives (ie KStep or other external Drives) Note KFLOP outputs "steps" to external drives and whether the drive interprets the "steps" as microsteps or full steps or servo steps are dependent on the Drive.
CL Step mode is used with Step/Direction Drives in a closed loop manner with feedback.
For External Step and Direction Outputs see Step and Direction Output Mode and Closed Loop Step/Dir Output Mode.
Input Channels

The Input Channels section specifies which channels for the selected input device will be used. Some Input Modes require two devices to be specified and some Input Modes only require one device. If the selected Input Mode only requires one device then the second Input Channel (Input Chan 1) is not used and my be set to any number. This may be the channel of an Encoder input or an ADC input depending on the selected input mode. Resolvers require two ADC input channels (for sine and cosine), for all other modes the second channel number is not used.
The gain and offset parameters are applied to the respective input device. The gain is applied before the offset, i.e. x' = ax+b, where a is the gain and b is the offset.
Incremental encoders only utilize the gain parameter which may be used to scale or reverse (using a negative gain) the measurement.
A Resolver is a device that generates analog sine and cosine signals as its shaft angle changes. Either one or multiple sine and cosine waves may be produced per revolution of a resolver. An encoder that generates analog sine and cosine signals may also be connected to a KFLOP as though it was a resolver. Resolver inputs may utilize both gains and offsets and be adjusted such that the sine and cosine ADC measurements are symmetrical about zero and have the same amplitude. Gain and offset errors may be introduced by either the ADC input circuitry and/or the Resolver itself. If one were to plot the sine vs. cosine signals as a resolver's position changes, the result should be circle KFLOP computes the arctangent of the point on the circle (also keeping track of the number of rotations) to obtain the current position. An offset or elliptical "circle" will result in a distorted position measurement throughout the cycle. Therefore note that adjusting the gains and offsets will result in changing the linearity of the position measurement, not the scale of the position measurement itself. The scale of a resolver input will always be 2π radians per cycle.
An ADC input uses a single absolute ADC channel input to obtain the position measurement Gain0 and Offset0 may be used to modify the ADC counts from -2048 .. +2047 to and desired range.
Output Channels
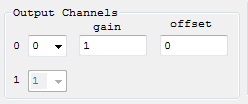
The Output Channels section specifies which channels for the selected output device will be used. Some Output Modes require two devices to be specified and some Output Modes only require one device. For Output modes that only require one output device the second device will be disabled. If the selected Output Mode only requires one device then the second Output Channel (Output Chan 1) is not used and my be set to any number. The specified output device may be the channel of a PWM connected to an on-board power amplifier, a Step/Direction Generator, or a DAC that is used to drive an external power amplifier.
Stepper mode and 4 phase brushless mode require two channels of PWM to be specified.
DC Servo motor (Brush motor type) only require one PWM channel.
3 Phase brushless motors require a consecutive pair of PWM channels In 3 Phase output mode, only the Output Channel 0 value is used and must be set to an even PWM number.
For Step and Direction output mode and CL Step (Closed Loop Step/Dir), the output channel 0 is used to specify which Step/Direction Generator will be used. Also the Output mode (step/Dir, quadrature, or CW/CCW) and drive type (LVTTL active high/low, or open collector, or differential) to be used. Each Step/Direction Generator has assigned I/O Pins. See Step and Direction Output Mode - KFLOP and Step and Direction Output Mode - Kogna.
Some output devices support the application of a gain and offset See also the related Console Commands OutputGain and OutputOffset.
Microstepper Amplitude, Max Following Error, Inv Dist Per Cycle, Lead Compensation
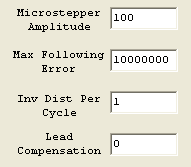
Microstepper Amplitude is only applicable to configurations with output mode of Microstepper with SnapAmps (Not Step/Dir Drives). This parameter sets the amplitude (of the sine wave) in PWM counts (0 .. 255) that will be output to the sine and cosine PWM channels while moving slowly or at rest. Note that at higher speeds KFLOP has the ability to increase the amplitude to compensate for motor inductance effects and may actually be higher. See Lead Compensation in this same section.
Max Following Error is applicable to all closed loop servo output modes (DC Servo, 3 Phase Brushless, 4 Phase brushless, DAC Servo, and Closed Loop Step/Dir). Whenever the commanded destination and the measured position differ by greater than this value, the axis will be disabled (if this axis is a member of the defined coordinate system, then any coordinated motion will also stop). To disable following errors set this parameter to a large value.
Max Following Error can be used to protect the system if anything goes wrong. For example if hitting an obstacle, servo going unstable, drive disabled, loss of motor power, etc. the Position will not be able to follow the trajectory and a relatively large error will occur and the axis will disable. This avoids any violent corrections that might otherwise occur. The Step Response Screen might be used to determine the maximum following errors for the axis under all normal conditions. Then set Max Following Error to a somewhat larger value. For example if the axis normally always follows with less than 100 counts of error the Max Following Error might then be set to 150.
If Following Errors occur under normal operations, the axis should be either tuned better so that following errors are reduced, or Velocity, Accelerations, and/or Jerk settings reduced to make the trajectories less demanding to follow. Otherwise the Max Following Error should be increased if such errors are tolerable for the application.
Inv Dist Per Cycle applies to Stepper, 3 Phase, and 4 Phase motors driven by SnapAmps. Note this parameter has no effect on External Step and Direction Drives. For a stepper motor, the distance per cycle defines the distance that the commanded destination should change by for a motor coil to be driven through a complete sinusoidal cycle. Parameter should be entered as the inverse (reciprocal) of the distance per cycle. Stepper motors are most often characterized by shaft angle change per "Full Step". A motor coil is driven through a complete cycle every four - "Full Steps". See the following examples:
Example #1 : A mechanism moves 0.001" for each full step of a step motorIt is desired for commanded distance to be in inches.
Result: One Cycle = 4 full steps = 0.004",Thus InvDistPerCycle = 1.0/0.004 = 250.0 (cycles/inch) Commanding a move of 1.00 will generate 250 sine waves, or the equivalent of 1000 full steps, or one inch of movement..
Example #2 : InvDistPerCycle is left at the default value of 1.0.
Result: Move units are in cycles Commanding a move of 50 will generate 50 sine waves, or the equivalent of 200 full steps, or one revolution of a 200 Step or 1.8 degree motor.
For 3 Phase or 4 Phase motors, Inv Dist Per Cycle represents the inverse of the distance for one complete commutation cycle See the example below.
Example #3 : A 3 phase motor/encoder has a 4096 count per revolution encoder which is used for position feedback and for motor commutation InputGain0 is set to 1.0 so position measurement remains as encoder counts. The motor design issuch that the commutation goes through 3 complete cycles each motor revolution.
Result: One Cycle = 4096 counts/3.0 Thus InvDistPerCycle = 3.0/4096 = 0.000732421875.
Note that it is important to use a high degree of precision to avoid commutation errors after moving to very large positions (or at constant velocity for a long period of time). KFLOP maintains Inv Dist Per Cycle (as well as position) as a double precision (64 bit) floating point number for this reason (more than 70 years at 1 MHz would be required to have 1 count of error).
Lead Compensation may be used to
compensate for motor inductance. When a voltage is applied to a coil at a
low frequencies, the current flow is dictated by the coil's resistance and is
constant. As the frequency increases at some point, where
 , the inductance, L,
begins to dominate and the current drops (see plot below). KFLOP's
Lead Compensator has the opposite effect, it has a constant gain of 1 and at
some point increases with frequency. The Lead Compensation parameter sets
(indirectly) the frequency where this occurs. If the frequency is set to
match the frequency of the motor, the effects will cancel, and the motor current
(and torque) will remain constant to a much higher frequency.
This assumes that the nominal drive voltage is lower than the available supply voltage. For example, a 5V stepper motor might be driven with a 15V supply to allow head room for the applied voltage to be increased at high frequencies (speeds).
The
simple formula that implements the Lead Compensation is:
v ' = v + Δv L
where v is the voltage before the compensation, v' is the voltage after the compensation, Δv is the change in output voltage from the last servo sample, and L is the Lead Compensation value.
The following formula will compute the "knee" frequency for a particular lead and servo sample rate (normally T=90 us).

or the inverse of this formula will provide the lead value to position the knee at a particular frequency.

The Following table generated from the above formula may also be used. For most motors the Lead Compensation values will be within the range of 5 - 20.
| Freq. Hz | Lead |
|---|---|
| 50 | 35.37 |
| 60 | 29.47 |
| 70 | 25.26 |
| 80 | 22.11 |
| 90 | 19.65 |
| 100 | 17.69 |
| 120 | 14.74 |
| 140 | 12.63 |
| 160 | 11.06 |
| 180 | 9.83 |
| 200 | 8.85 |
| 220 | 8.04 |
| 240 | 7.37 |
| 260 | 6.81 |
| 280 | 6.32 |
| 300 | 5.90 |
| 350 | 5.06 |
| 400 | 4.43 |
| 450 | 3.94 |
| 500 | 3.55 |
| 550 | 3.23 |
| 600 | 2.96 |
| 650 | 2.74 |
| 700 | 2.54 |
| 750 | 2.38 |
| 800 | 2.23 |
| 850 | 2.10 |
| 900 | 1.99 |
| 950 | 1.88 |
| 1000 | 1.79 |
This plot above displays a simple 0.5 second motion with no Lead Compensation for a Microstepper Motor. Position axis shown on the primary (left axis) for the red plot has units of cycles. PWM output shown on the secondary (right axis) for the green plot has units of PWM counts. Move parameters are: Vel=200 cycles/sec, Accel=200 cycles/sec2, Jerk=10000 cycles/sec3. Note that regardless of velocity PWM amplitude is constant.
This plot displays the same 0.5 second motion with Lead Compensation = 27.0. All other parameters same as above. Note how PWM amplitude increases with velocity.
If motor parameters are unknown, a trial and error approach may be used to find the best lead compensation value. The following procedure may be used:
- Set Lead Compensation to zero
- Increase motor speed until a drop in torque is first detected
- Increase Lead Compensation until normal torque is restored
Setting the Lead Compensation too high should be avoided, as it may cause over current in the motor at medium speeds or voltage distortion due to saturation (clipping).
Note with current mode drives such as SnapAmp Lead compensation for motor inductance is not normally required.
Master/Slave Settings
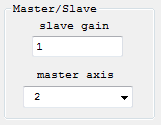 Configures the axis to be slaved to another axis. If slaved when the
master axis moves, this axis will be commanded to move by an amount as scaled by
the slave gain. If the Slave Gain is negative the slaved axis will move in
the opposite direction as the Master. See also Console commands
SlaveGain and
MasterAxis. Setting the Master axis as -1 will disable slaving for
this axis.
Backlash Settings
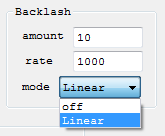
Configures the Backlash Compensation for the axis. To compensate for backlash in an axis, an offset in the commanded position may be applied when moving in the positive direction, and not applied when moving in the negative direction. The amount and rate at which the offset is applied is specified here. See also BacklashMode, BacklashAmount and BacklashRate Console commands.
Limit Switch Options
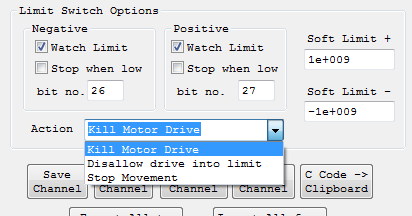 KFLOP has the ability to monitor limit switch inputs for each
axis and stop motion when a physical limit switch is detected. The limit
switch options allow this feature to be enabled or disabled for each limit
(positive or negative), what specific bit to be monitored for each limit, what
polarity of the bit indicates contact with the limit, and what action to perform
when a limit is detected.
Select Watch Limit to enable limit switch monitoring.
Select Stop when low to select negative true logic for the limit (motion will be stopped when a low level is detected).
Specify a bit no. for which bit is to be monitored for the limit condition. See the Digital IO Screen for current I/O bit status and a recommended bit assignment for limit switches (bits 12 through 19). If in a particular application it isn't critical to determine which Limit Switch (either positive or negative, or even which axis) the number of digital I/O bits consumed by limit switches may be reduced by "wire ORing" (connecting in parallel) multiple switches together. In this case, the same bit number may be specified more than one place.
The Action drop down specifies what action should be performed when a limit is encountered.
Kill Motor Drive - will completely disable the axis whenever the limit condition is present. Note that it will not be possible to re-enable the axis (and move out of the limit) while the limit condition is still present and this mode remains to be selected.
Disallow drive into limit - will disable the axis whenever the limit condition is present and a motion is made into the direction of the limit. This mode will allow the axis to be re-enabled while inside the limit and will allow a move away from the limit.
Stop Movement - this action will keep the axis enabled, but will FeedHold the Coordinate System. This will cause commanded positions to decelerate to a stop in a controlled manner. Independent motions will decelerate to a stop in the same manner as a Jog to zero speed would cause. Coordinated Motion will decelerate all axes to a stop along the motion path.
The FeedHold mode will remain and prevent any further motion until cleared
In KMotion.exe the ![]() button will flash and can be pushed to clear the Feedhold In KMotionCNC
Feedhold can be cleared by pushing
button will flash and can be pushed to clear the Feedhold In KMotionCNC
Feedhold can be cleared by pushing
 . If
further motion is attempted into the Soft Limit another Feedhold will occur.
However if no motion, or motion out of the Limit, Feedhold will remain clear and
the motion will be allowed.
Soft Limits
Soft Limits will always prevent motion in the same manner as a Hardware Limit with the Stop Movement Action Selected. This occurs regardless of the Action Type Selected for the Hardware Limit Switches. To disable Soft Limits set them to a huge range which could never occur. Soft Limits prevent motion within KFLOP when Jogging, moving and so forth. They also are are uploaded by Applications such as KMotionCNC and used to prevent motion during Trajectory Planing.
Launch on Power Up
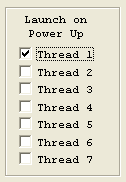
The launch on power up configuration specifies which User Programs are to be automatically launched on power up for stand alone operation of KFLOP See the C Program Screen for information on how to Edit, Compile, and Download a C program into KFLOP for execution into one (or more) of the 7 Thread program spaces within KFLOP.
To configure a program execute on power up, perform the following steps:
- Compile and Download a C Program to a particular Thread Space.
- Select Launch on Power Up for the same Thread.
- Flash the User Memory (see following section).
- Cycle Power on the KFLOP.
FLASH - KFLOP (see below for Kogna)
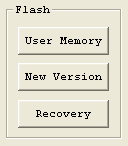
The entire user memory space may be Flashed into nonvolatile memory by depressing the Flash - User Memory button. This saves all of the axis configurations, all user program thread spaces, and the user persistent data section. On all subsequent power up resets, KFLOP will revert to that saved configuration. (Note that it is preferred to have the host, or a user program, configure the board before each use rather than relying on the exact state of a KFLOP set to a particular state at some point in the past).
To upgrade the system firmware in a KFLOP use the Flash - New Version button. The user will be prompted to select a DSPKFLOP.out COFF file from within the KMotion Install Directory to download and Flash. Note that all user programs and data will be deleted from KFLOP when loading a new version
After the firmware has been flashed it is necessary to re-boot the KFLOP in order for the new firmware to become active.
It is important that the <Install Directory>\DSP_KFLOP\DSPKFLOP.out file match the firmware that is flashed into KFLOP. User C programs are Linked using this file to make calls and to access data located within the KFLOP firmware. Whenever a user program is compiled and linked using this file, the timestamp of this file is compared against the timestamp of the executing firmware (if a KFLOP is currently connected). If the timestamps differ, an error message will be displayed, and it is not recommended to continue. The "Version" Console Script Command may also be used to check the firmware version.
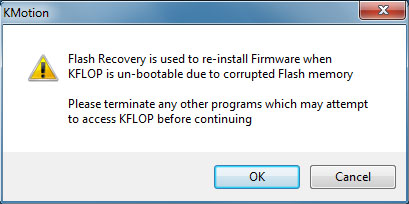
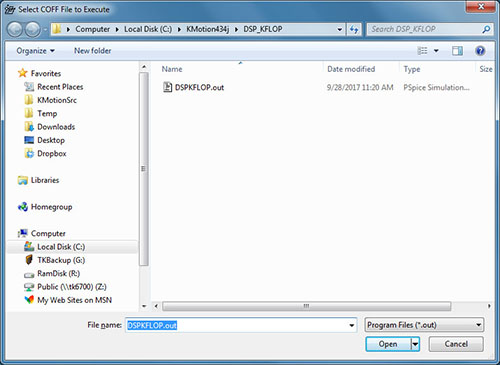
In all cases while flashing firmware or user programs the process should not be interrupted or a corrupted flash image may result which renders the board un-bootable. However if this occurs the Flash Recovery mode may be used to recover from the situation. To perform the recovery, press the Flash Recovery button and follow the dialog prompts to:
- Turn off KFLOP
- Run KMotion.exe, Config/Flash Screen, select "Recovery"
- Click OK (see below)
- Select the DSPKFLOP.out file to boot (see below)
- Click OK
- When prompted, turn on KFLOP
- After KFLOP boots, Flash the New Version
FLASH Kogna

The entire user memory space may be Flashed into nonvolatile memory by depressing the Flash - User Memory button. This saves all of the axis configurations, all user program thread spaces, and the user persistent data section. On all subsequent power up resets, Kogna will revert to that saved configuration. (Note that it is preferred to have the host, or a user program, configure the board before each use rather than relying on the exact state of a Kogna set to a particular state at some point in the past).
To upgrade the system firmware in a Kogna use the Flash - New Version button. The user will be prompted to select a DSPKOGNA.out COFF file from within the KMotion Install Directory to download and Flash. Note that all user programs and data will be deleted from Kogna when loading a new version. This command can be used to remove all User Flashed Programs and data.
After the firmware has been flashed it is necessary to re-boot Kogna in order for the new firmware to become active.
It is important that the <Install Directory>\DSP_KOGNA\DSPKOGNA.out file match the firmware that is flashed into Kogna. User C programs are Linked using this file to make calls and to access data located within the Kogna firmware. Whenever a user program is compiled and linked using this file, the timestamp of this file is compared against the timestamp of the executing firmware (if a Kogna is currently connected). If the timestamps differ, an error message will be displayed, and it is not recommended to continue. The "Version" Console Script Command may also be used to check the firmware version.
In all cases while flashing firmware or user programs the process should not be interrupted or a corrupted flash image may result which renders the board un-bootable. However if this occurs the Flash Recovery mode may be used to recover from the situation. To perform the recovery:
- Turn off Kogna
- Turn on Kogna
- While Kogna's LEDs are flashing remove Jumper JP13
- Run KMotion.exe, Config/Flash Screen, select "New Version"
- Select the DSPKOGNA.out file to Flash
- Click OK
- After successful, cycle power