Configuring Step and Direction Outputs for Kogna
Kogna supports connection to motor amplifiers that utilize step and direction (or quadrature or CW/CCW Pulses) inputs to control the motion. Step and direction motor amplifiers are typically used with stepper motors with or without micro-stepping capability. Each "step" causes the motor amplifier to advance the motor position one step in the direction specified by the "Direction" signal. Some Servo Amplifiers may also operate in Step/Direction Mode. Only two digital output signals are required for this interface.
Fine micro-stepping resolution combined with high motor RPM can result in step rates in the megahertz. For example, a 200 step/rev stepping motor with 128:1 micro-stepping running at 3000 RPM requires:
3000 RPM / 60 Sec/Min * 200 steps/rev * 128 Ásteps/full step = 1.28 MHz Ásteps/sec
Kogna has 16 axes of Step and Direction. Output pulses up to 2.5 MHz can be generated.
Kogna features 12 Axes of +5V Differential Drivers (24 differntial drivers to 48 connector pins). The first 8 Step/Dir Generators can be independently configured to drive a pair of differential Drivers or 3.3V KFLOP compatible pins with an 8-bit R/W FPGA Register called STEP_DIR_TO_DIFF. Each bit muxes the corresponding Step/Dir Generator. Writing a '1' to the bit will Connect the Step/Dir Generator to the differential Driver. Kogna will automatically control the corresponding Differential Enable Bits based on bit 7 of the Axis Configuration OutputChannel number so this is not normally necessary to be set by a User. For example to multiplex all 8 to differential Drivers the following C Code might be used:
FPGA(STEP_DIR_TO_DIFF) = 0xFF;
The first 8 Axes of Step/Dir outputs can also operate in a Single Ended KFLOP compatible manner where they are normally hard wired to IO bits 8 through 15 on JP7 and IO bits 36 through 43 on JP5. Additionally the first 4 Step/Dir outputs can be multiplexed to connectors JP4 and JP6 if desired. This may be required if JP7 is used for some other purpose such as interfacing to the Kanalog I/O Expander. A global multiplexing bit is used to switch the outputs to the alternate connectors.
Note that the first 8 of 10 I/O pins of Aux #0 and Aux #1 have internal 150 Ohm pull down resistors. Therefore Pins JP4-13, JP4-14, JP6-13 and JP6-14 may not be used in Open Collector mode.
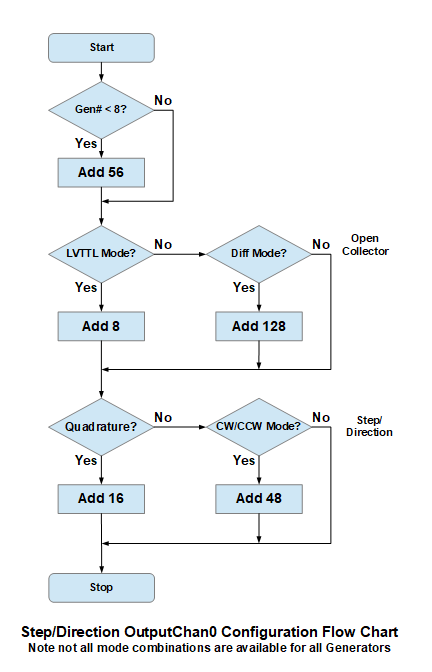
Axis output channel settings 0-255 are allowed for Kogna. Although only 16 Step and Direction generators are available for Kogna. By adding specific constants to the channel number the operation mode and output mode of each Step/Dir Generator can be changed independently. Not all Output Drive modes are valid for all Generators.
Adding 8 to the channel number uses the same generator to be used except the output pins are actively driven (high and low) as 3.3V LVTTL signals instead of only driven low as open collector outputs.
Adding 16 to the channel number switches the generator from Step/Dir to Quadrature output mode.
Adding 48 to the channel number switches the generator from Step/Dir to CW/CCW output mode.
Adding 64 to the channel number switches to the second bank of 8 generators (this is to maintain legacy compatibility with KFLOP's channel 8 Axes numbering scheme)
Adding 128 to the channel number selects Differntial Output mode and pins (only available on Generators 0-11)

Step/Dir Generators 8-11 will always drive diffential Drivers 16-23 whenever they are enabled.
Any IO pin not being driven by a Step/Dir Generator may be used for other purposes such as GPIO.
If an axis channel is selected as a Step and Direction axis and enabled, the corresponding 2 output pins will be automatically configured as outputs (if necessary) and they may not be used as general purpose IO.
See diagram below. For a larger image click here.
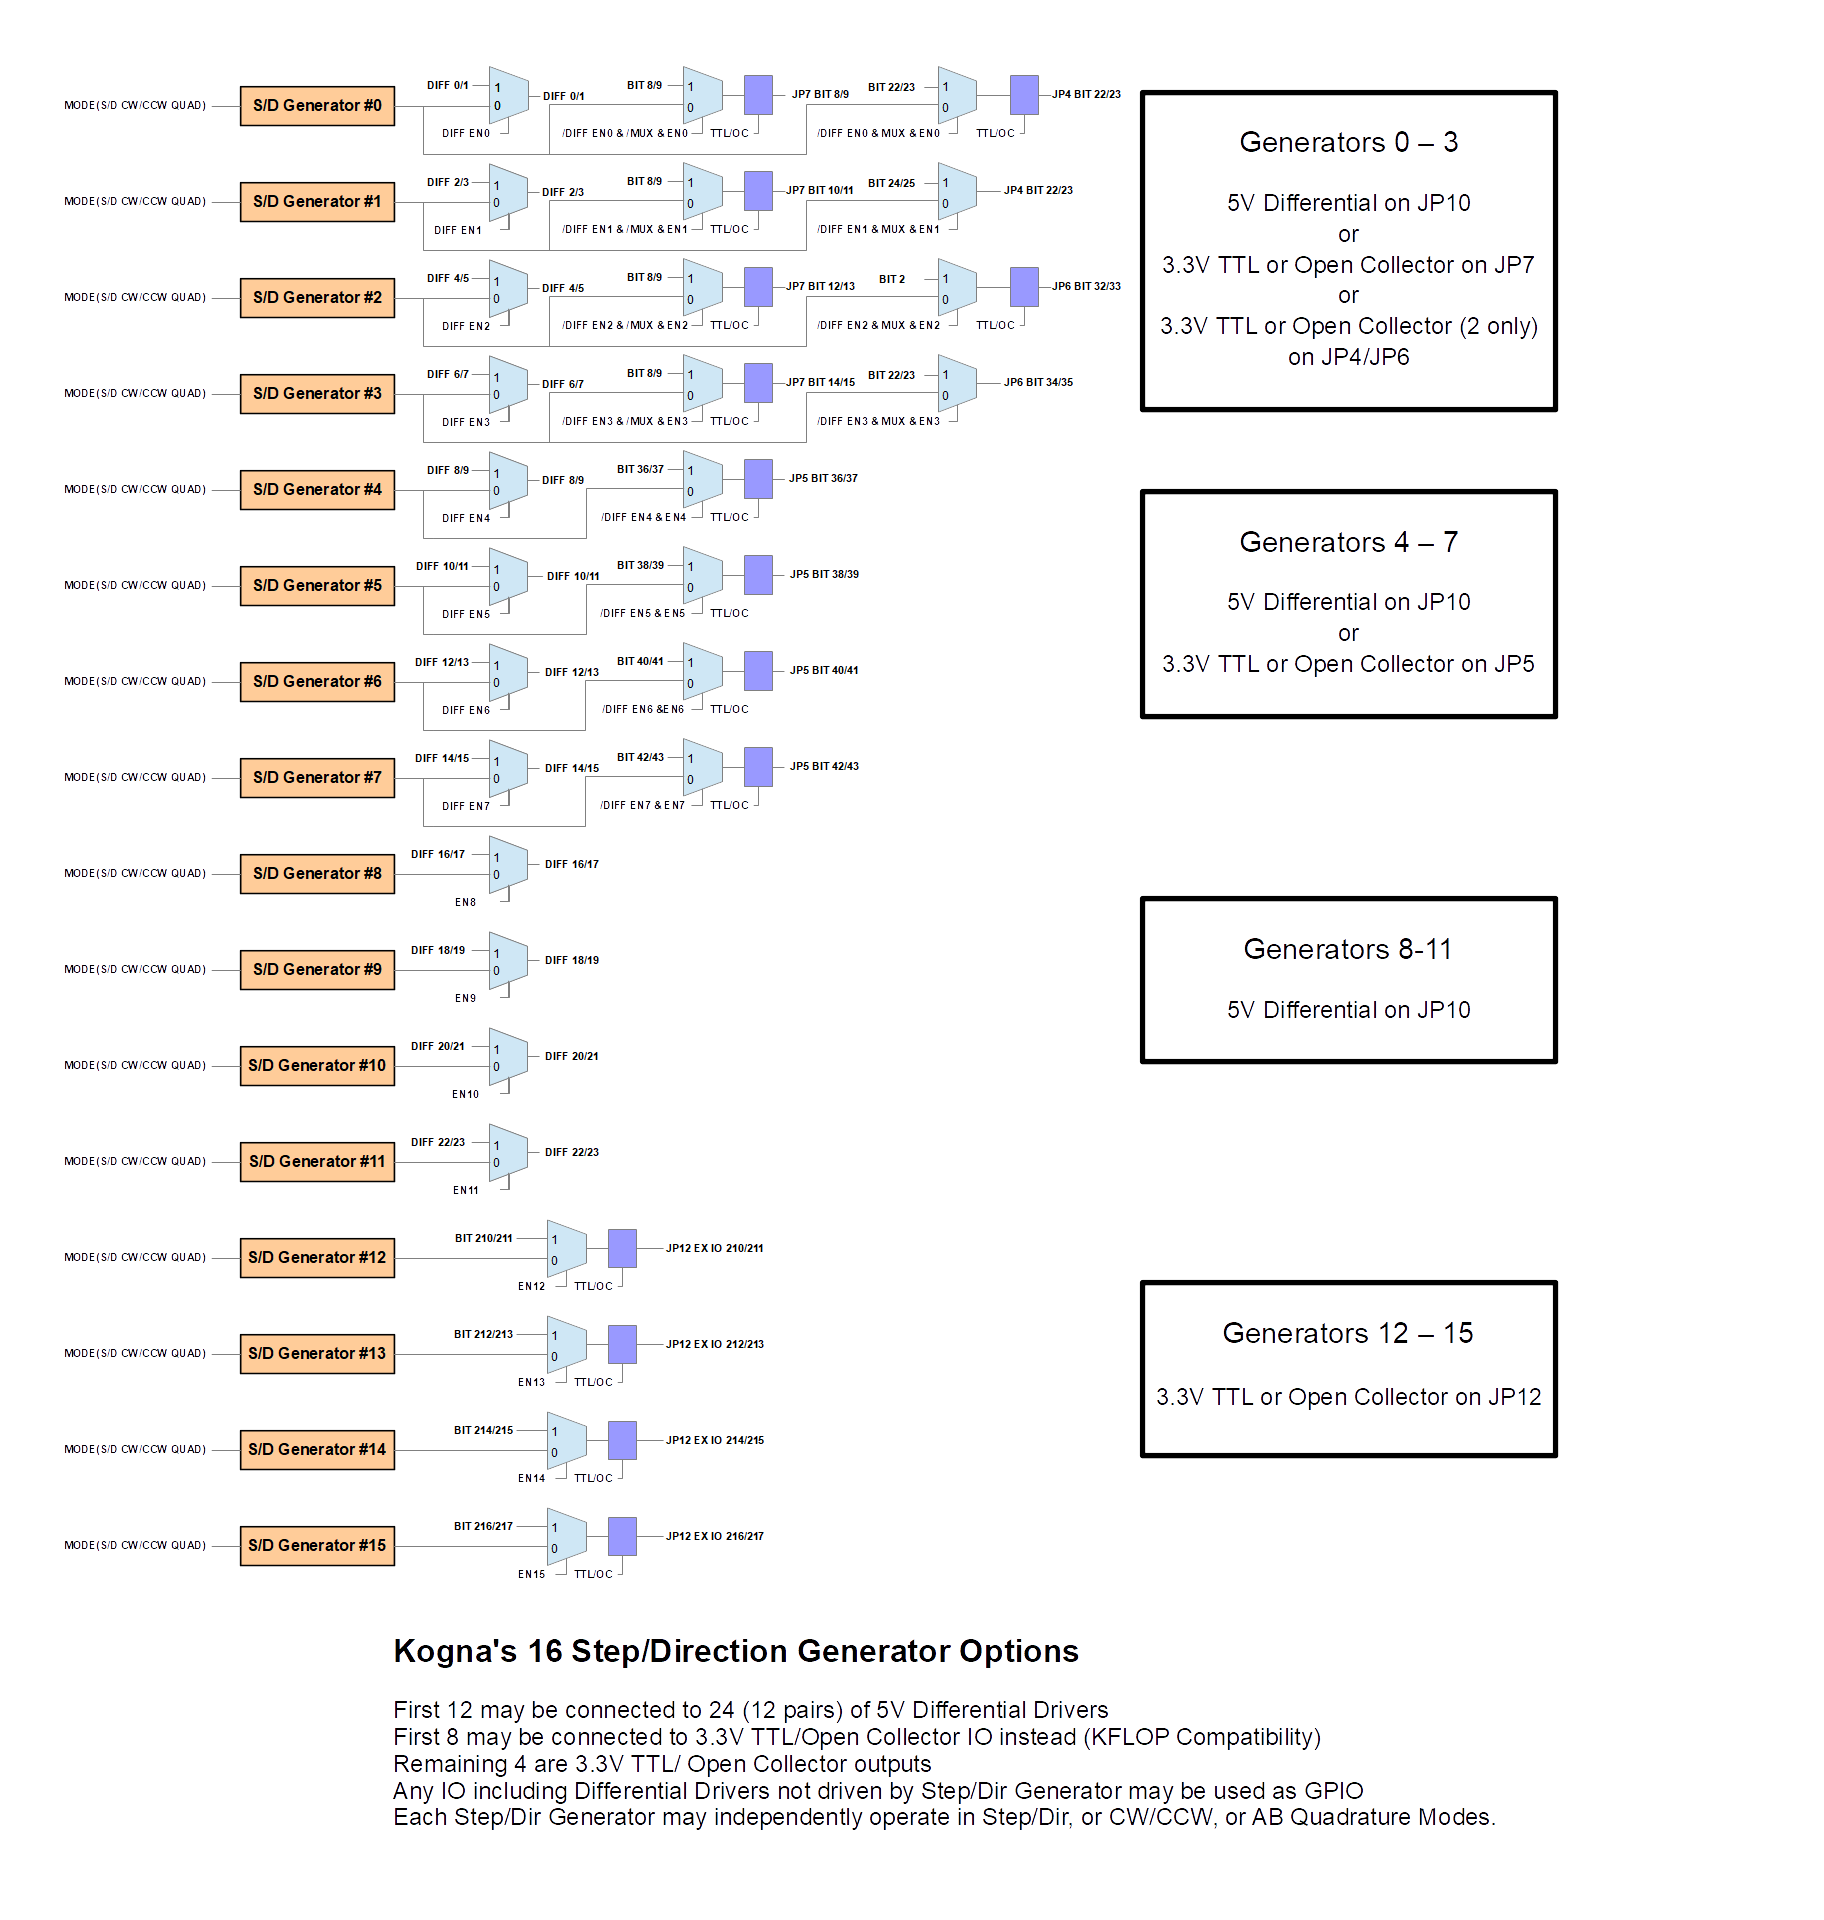
The tables below lists the IO Bit and Pin numbers associated with the Step/Dir Generator and the Mode and Multiplex option:
Generators 0-3 have 3 options:
| Enable Diff = 1 | Enable Diff = 0 | |||||
|---|---|---|---|---|---|---|
| Mux = X | Mux = 0 | Mux = 1 | ||||
| Signal | IO Bit | Pins | IO Bit | Pin | IO Bit | Pin |
| Step 0 | 250 | JP10 - 1 & 2 | 8 | JP7 - 15 | 22 | JP4 - 13 |
| Direction 0 | 251 | JP10 - 3 & 4 | 9 | JP7 - 16 | 23 | JP4 - 14 |
| Step 1 | 252 | JP10 - 5 & 6 | 10 | JP7 - 17 | 24 | JP4 - 15 |
| Direction 1 | 253 | JP10 - 7 & 8 | 11 | JP7 - 18 | 25 | JP4 - 16 |
| Step 2 | 254 | 12 | JP7 - 19 | 32 | JP6 - 13 | |
| Direction 2 | 255 | 13 | JP7 - 25 | 33 | JP6 - 14 | |
| Step 3 | 256 | 14 | JP7 - 21 | 34 | JP6 - 15 | |
| Direction 3 | 257 | 15 | JP7 - 22 | 35 | JP6 - 16 | |
Generators 4-7 have 2 options:
| Enable Diff = 1 | Enable Diff = 0 | |||
|---|---|---|---|---|
| Signal | IO Bit | Pins | IO Bit | Pin |
| Step 4 | 258 | 36 | JP5 - 1 | |
| Direction 4 | 259 | 37 | JP5 - 2 | |
| Step 5 | 260 | 38 | JP5 - 3 | |
| Direction 5 | 261 | 39 | JP5 - 4 | |
| Step 6 | 262 | 40 | JP5 - 5 | |
| Direction 6 | 263 | 41 | JP5 - 6 | |
| Step 7 | 264 | 42 | JP5 - 7 | |
| Direction 7 | 265 | 43 | JP5 - 8 | |
Generators 8-11 are Differential only:
| Signal | IO Bit | Pins |
|---|---|---|
| Step 8 | 266 | JP14 - 9 & 10 |
| Direction 8 | 267 | JP14 - 11 & 12 |
| Step 9 | 268 | JP14 - 13 & 14 |
| Direction 9 | 269 | JP14 - 15 & 16 |
| Step 10 | 270 | JP14 - 17 & 18 |
| Direction 10 | 271 | |
| Step 11 | 272 | |
| Direction 11 | 273 |
Generators 11-15 3.3V IO only:
| Signal | IO Bit | Pin |
|---|---|---|
| Step 12 | 200 | JP12 - 11 |
| Direction 12 | 201 | JP11 - 12 |
| Step 13 | 202 | JP12 - 13 |
| Direction 13 | 203 | JP12 - 14 |
| Step 14 | 204 | JP12 - 15 |
| Direction 14 | 205 | JP12 - 16 |
| Step 15 | 206 | JP12 - 17 |
| Direction 15 | 207 | JP12 - 18 |
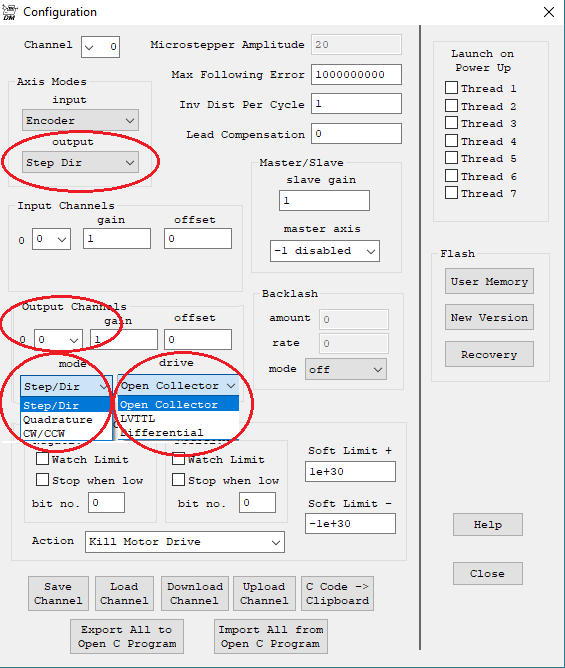
The simplest method to configure a Step/Dir Axis and its various channels and modes is to use the KMotion.exe Configuration Screen shown below. To configure an axis as step and direction, on the Configuration Screen select output mode as "Step Dir" and select which of the 16 available Step and Direction generators should be used by setting the appropriate Output Channel 0 setting. Also select the appropriate operational mode and output Drive mode. See below.
If your amplifier has opto coupler inputs driven by +5V then a 5V Differential Drive Output is the best choice. Either as single ended 5V signals (by using one of the 5V differential outputs) or differential 5V signals. Differential signals allow faster step rates.
If a Differntial Drive Output is not available then a 3.3V output must be used. In this case open-collector mode is likely to work better. The diagram below shows how the open collector mode works driving the LED of an Opto Coupler with the anode connected to +5V.
However if the amplifier has standard logic inputs then LVTTL outputs should work better as the pin is actively driven high and low.
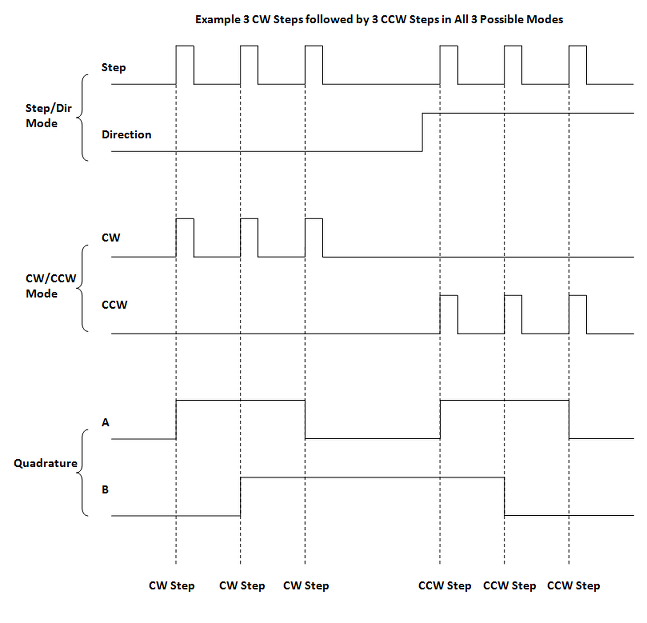
Quadrature outputs are required for some amplifiers. Quadrature outputs output two A B phases instead of Step/Dir signals. An advantage is that only one signal edge transition takes place for each "step" as opposed to a complete pulse and any Direction Setup Time and Minimum pulse time is avoided. Quadrature mode is selected by adding 16 to the Output Channel Number.
CW/CCW Mode is also available. In this mode instead of having a Direction signal there is a separate output for CW and CCW Pulses. This mode avoids any Direction Setup Time as well. CW/CCW mode is selected by adding 48 to the Output Channel Number.
The table below summarizes the Output Channel Number to specify to select the desired Generator and Mode:
| Step/Dir mode +0 | Quadrature mode +16 | CW/CCW mode +48 | |||||||
|---|---|---|---|---|---|---|---|---|---|
| Generator | Differential +128 |
Open Collector +0 |
LVTTL +8 |
Differential +128 |
Open Collector +0 |
LVTTL +8 |
Differential +128 |
Open Collector +0 |
LVTTL +8 |
| 0 | 128 | 0 | 8 | 144 | 16 | 24 | 176 | 48 | 56 |
| 1 | 129 | 1 | 9 | 145 | 17 | 25 | 177 | 49 | 57 |
| 2 | 130 | 2 | 10 | 146 | 18 | 26 | 178 | 50 | 58 |
| 3 | 131 | 3 | 11 | 147 | 19 | 27 | 179 | 51 | 59 |
| 4 | 132 | 4 | 12 | 148 | 20 | 28 | 180 | 52 | 60 |
| 5 | 133 | 5 | 13 | 149 | 21 | 29 | 181 | 53 | 61 |
| 6 | 134 | 6 | 14 | 150 | 22 | 30 | 182 | 54 | 62 |
| 7 | 135 | 7 | 15 | 151 | 23 | 31 | 183 | 55 | 63 |
| 8 | 192 | 64 | 72 | 208 | 80 | 88 | 240 | 112 | 120 |
| 9 | 193 | 65 | 73 | 209 | 81 | 89 | 241 | 113 | 121 |
| 10 | 194 | 66 | 74 | 210 | 82 | 90 | 242 | 114 | 122 |
| 11 | 195 | 67 | 75 | 211 | 83 | 91 | 243 | 115 | 123 |
| 12 | N/A | 68 | 76 | N/A | 84 | 92 | N/A | 116 | 124 |
| 13 | N/A | 69 | 77 | N/A | 85 | 93 | N/A | 117 | 125 |
| 14 | N/A | 71 | 78 | N/A | 86 | 94 | N/A | 118 | 126 |
| 15 | N/A | 71 | 79 | N/A | 87 | 95 | N/A | 119 | 127 |
For a table mapping from Output Channel Number to Generator and mode see here.
Note when configuring the motion profile for a Step and Direction Axis the appropriate maximum Velocity, Acceleration, and Jerk should be set in units of steps/sec, steps/sec2, and steps/sec3 respectively. From Kogna's perspective a "step" is the movement for a step pulse to the Drive which may or may not actually be a micro-step depending on the Drive and its settings.
Global Register sets Pulse Width, Polarity, Multiplexor
To change the Step/Dir Pulse width, Step Pulse Polarity, and connector multiplexor for channels 0-3 a programmable register in Kogna's FPGA may be used.
Kogna has the capability to program the Step pulse width as a 6-bit value. The default setting is 2us. The pulse length may be adjusted from 1 to 63 of 16.67 MHz clocks. Which corresponds to 60ns to 3.78us. Using a long pulse length limits the maximum frequency that can be generated. For example with the default pulse length of 2us the frequency should not exceed 1/(2 x 2us) = 250KHz.
Kogna sets the Direction output 1.92us before generating a Step Pulse. With the maximum Step Pulse length of 3.78us the maximum Direction Setup time to the trailing edge of the Step Pulse is 5.7us.
Setting Bit-6 high of the register can be set high to multiplex Step/Dir generators 0-3 from JP7 to JP4 and JP6.
Setting Bit-7 high will invert the Step Output pulse so that it pulses High rather than Low. Some Amplifiers (Geckos) prefer this mode. If the drive "steps" on the falling edge of the pulse, then this option will provide more setup time for the Direction Signal.
A User C Program must be used to change the FPGA register. The following statement should be used:
	FPGA(STEP_PULSE_LENGTH_ADD)=32;					// set the pulse time to ~ 2μs
	FPGA(STEP_PULSE_LENGTH_ADD)=32 + 0x40;			// set the pulse time to ~ 2μs and multiplex to JP4 and JP6
	FPGA(STEP_PULSE_LENGTH_ADD)=32 + 0x80;			// set the pulse time to ~ 2μs and pulse the Step High
	FPGA(STEP_PULSE_LENGTH_ADD)=32 + 0x40 + 0x80 	// set the pulse time to ~ 2μs, mux to JP4 and JP6, and pulse the Step High
Example Configuration for a IM804 Amplifier and Rapidsyn Stepper
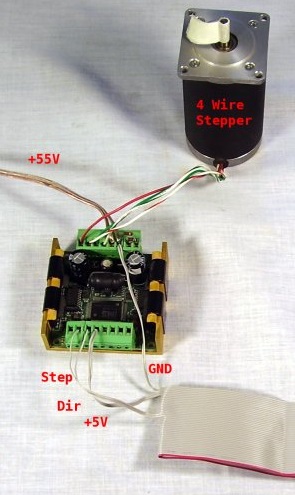
Layout - KMotion - Amplifier - Motor

Amplifier Connections - resistors set coil currents (1500 ohms = 3A) and idle standby current (270 ohms = 0.5A). DIP Switches set to ON-OFF-OFF-ON for 128:1 micro-stepping.
Rapidsyn stepper motor. Note coil winding's centertaps are not used.
Axis channel 0 configures as "Step Dir" mode and using Step and Direction generator 0.
Max Velocity 1.6 x 10⁶ steps/sec (1.6e6 / 128 = 12,500 sps = 3750 RPM). Note this (and most) steppers lose most all of their useful torque above several thousand full steps per second. The high speed demonstrated here is intended to demonstrate KMotion's ability to generate high pulse rates.
Max Acceleration 6 x 10⁶ steps/sec2.
Max Jerk 2 x 10⁸ steps/sec3.
1 x 10⁶ count Move performed and data captured over 3 seconds.
Pushing Move downloads all parameters, enables the axis, performs the movement, and plots the result.
Note after the axis has been enabled, digital IO bits 8 and 9 have automatically been configured as outputs for use by Step and Direction Generator #0.
Watch a video showing slow and smooth acceleration of this configuration up to 12,500 full steps per second (1.6 MHz @ 128 microsteps/full step).